Limited
Aircraft Maintenance Item Codes
Select Maintenance Codes from the File Menu to access the aircraft maintenance item editing screen. The 'Items' button located on the Aircraft Maintenance screen will also open this option.
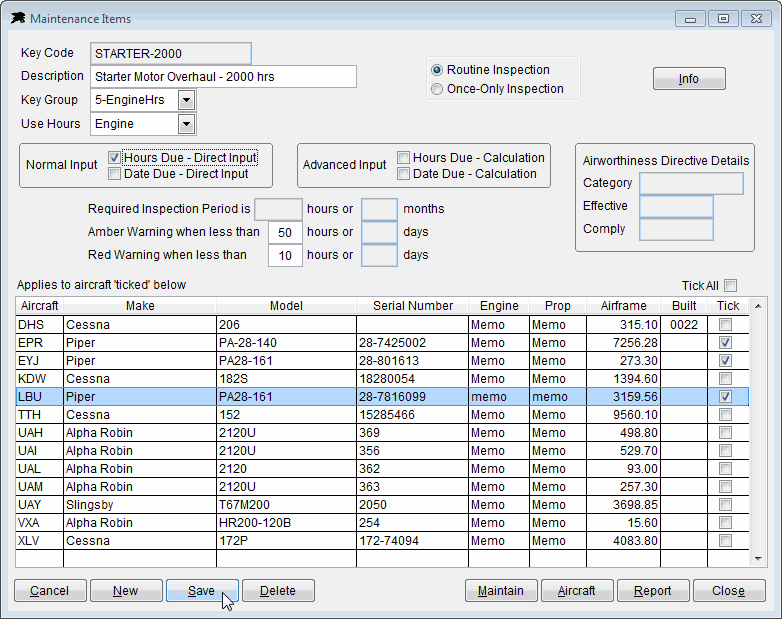
The maintenance item codes assist you by allowing you to set up a single maintenance item that can be used by one or more aircraft. For example, there is usually a single Maintenance Item Key Code (e.g. HR-0050) for the Routine 50 Hour Check and can be used on all your fleet aircraft. This means you only set up one code and simply select the aircraft that need it from the attached fleet list. In other cases you may need more than one code for a similar item. An example is engine STARTER motor overhauls. Because some may have a life of 2000 hours and others a life of 2400 or 1500 hours, then you simply create separate codes such as STARTER-2000 and STARTER-2400 that have different hours or months to run. Then simply 'tick' the relevant aircraft that use each key code. Follow these steps to create a new maintenance Key Code....
1. Click the 'Items' button from the Aircraft Maintenance screen or use File Menu then Maintenance Codes.
2. Click the 'Cancel' button or press ESC to clear the Maintenance Items screen so that you start with empty fields.
3. Click the 'New' button and input the new code into the Key Code field. example: STARTER-2000 (Lets assume we need a code for starter overhauls due every 2000 hours)

4. Input a description into the 'Description' field. e.g. 'Starter Motor Overhaul - 2000 hrs'
5. Set the Key Group to a relevant group. In this case I would use '5-EngineHrs' group because it is directly related to that.
6. The 'Use Hours' field can be set to monitor Airframe or Engine hours. If you have set up the aircraft file above with an engine hours conversion factor, then you would select 'Engine here', otherwise select 'Airframe'.
7. For simple normal input, tick the 'Hours Due Direct Input' or for advanced mode Tick 'Hours Due Calculation' and/or 'Date Due Calculation' box as required and input the number of hours (2000 in this case) or months that the item requires. You should now input the amber and red warning values (eg 50 hours for amber, or 10 hours for red). In this case, you would only tick one of the 'Hour' options because this Starter overhaul is due every 1500 hours and does not have a date input requirement.
8. Tick the aircraft that need this item in the grid below, then click the 'Save' button. For this example, this inspection is only required on Piper aircraft so only those are ticked.
9. Click the 'Maintain' button or go back to your Aircraft Maintenance screen, call up the required aircraft you have ticked and input the date last done or hours last done in the new added maintenance item. If no date or hours have been input, they will display green input fields. This means you should input and save the required data.
How to add a new Airworthiness Directives
1. Click the 'Items' button from the Aircraft Maintenance screen or use File Menu then Maintenance Codes.
2. Click the 'Cancel' button or press ESC to clear Maintenance Items form so that you start with empty fields.
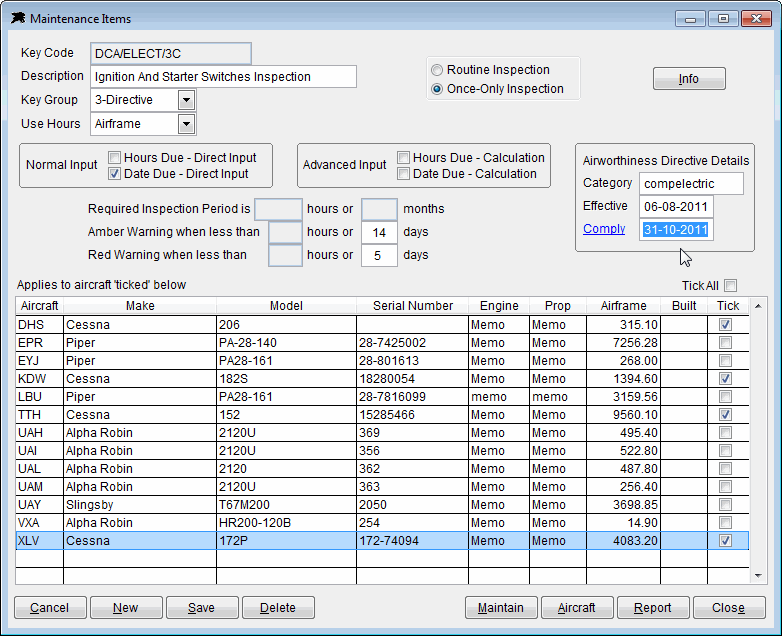
3. Click the 'New' button and input the new AD code into the Key Code field...

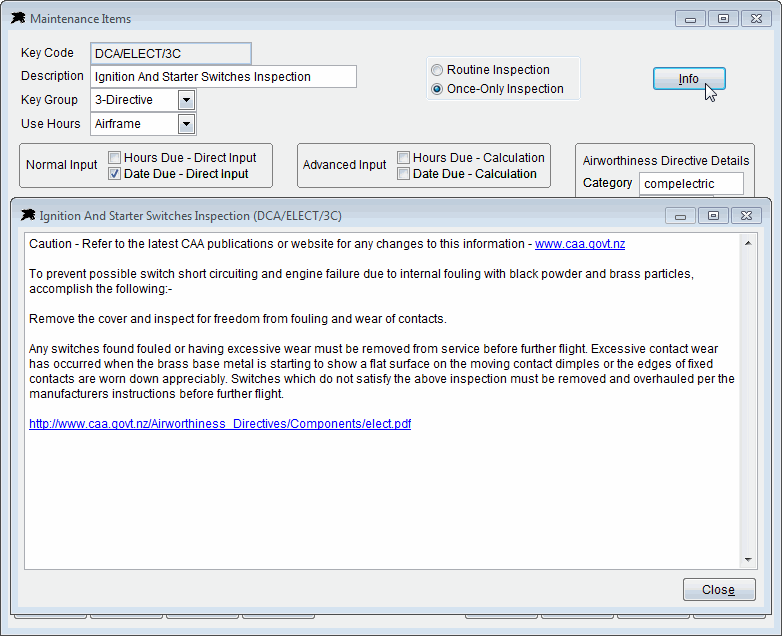
4. Go to the CAA Website and look up the Airworthiness Directives page. Highlight the AD text you want and use and copy it. (Ctrl+C or right click mouse and click Copy). Click the 'Info' button on the Maintenance Items screen and use Paste or Ctrl V to copy the CAA AD text into Datahawk Copilot.

5. Put the AD heading text into the 'Description' field.
6. Make sure the Key Group is set to '3-Directive'.
7. 'Use Hours' field should be set to 'Airframe'.
8. Tick your choice of 'Hours Due' and or 'Date Due' boxes. Input number of hours or months that the AD requires if you want it calculated and then input the amber and red warning values.
9. Select the AD 'Category' from the list and input the effective and Comply (Compliance Date) dates if you wish.
10. Tick the aircraft that need this AD in the grid below, then click the 'Save' button.
11. Click the 'Maintain' button or go back to your Aircraft Maintenance screen, call up the required aircraft and input the date due or date last done or hours due or hours last done in the new added AD where the green input fields are displayed.