Limited
Networking Datahawk Applications
Datahawk applications are designed for multi-user operation. This document details the normal procedure to connect multiple workstation local area network users to a Datahawk system installed on a file server.
Step 1 - Install the Datahawk application onto the file server. Caution - We will normally supply a specific server installation file for your server copy only. Please do not install this master file onto other workstations unless we instruct you to do so. Workstations require a special installation that is detailed below.
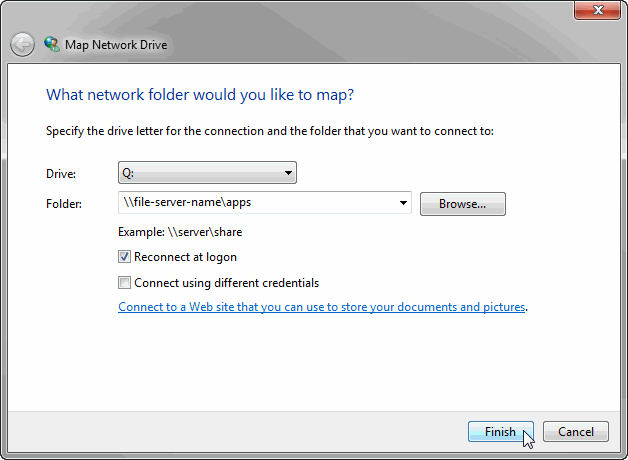
Step 2 - From a workstation, find the Windows option to 'Map Network Drive' found on the Windows Explorer Tools menu. Create a common network drive letter mapped to the server where the Datahawk application is installed.
Here is an example where drive Q:\ will be mapped to the \apps folder on the File Server...

Step 3 - Download the Workstation Install File from our file server or check your file server Datahawk application folder for a file named 'Workstationinstall.exe'. Run this file to install the necessary operating system components onto your local workstation drive. Note: The networked Datahawk system will not operate without the workstation files installed.
Step 4 - Browse to the new mapped network drive that you created in Step 2 and locate the Datahawk application (The default folder name is normally 'Copilot'). Locate the program file named 'Copilot.exe' and then create or drag a Shortcut to this file onto your workstation desktop.
Step 5 - Double click the shortcut to start the Datahawk application.
If you receive a security warning when running the software, you should set up your system settings by following the How To Stop Unknown Publisher Warnings instructions.
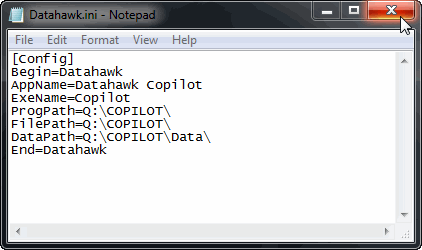
Important - Most Datahawk applications have a file named Datahawk.ini located in the root directory of the installed application. This file stores the common networked drive letter and paths to the working folders. If you change the drive letter mapping on a workstation, the program will not be able to find the program and data files to run and you will receive an error during start up.
The following example shows the Datahawk.ini file settings where Q: is the common network drive...

If you need to change the workstation drive letter, then you will need to edit the Datahawk.ini file and change the drive letter also. ALL workstations need to have the same mapped drive letter for the system to operate normally.
Advanced Networking Notes
If your network uses a Group Policy Object (GPO) to map the drive containing the Datahawk Copilot system, please ensure that the 'Action' parameter is set to 'Update' instead of 'Replace'...
Reason: If your drives are mapped in the group policy and the policy specifies 'Replace', the drive will disconnect and then reconnect every time the policy is refreshed which will randomly disconnect the Copilot.exe file from the networked system. This will cause system errors regularly and particularly if you are running Windows 10 workstations. Windows 7 and earlier versions will tolerate the 'Replace' parameter but Windows 10 will not.
Solution: Change the group policy to 'Update' rather than 'Replace' the drive mapping. (Edit GPO User Configuration > Preferences > Windows Settings > Drive Maps)