
Limited
Aircraft Maintenance Tracking Operation
Select Maintenance from the Flightops Menu to access the Aircraft Maintenance Tracking system.
If you have not yet set up your Aircraft Maintenance system and want to get started, please follow the instructions found on the Maintenance System Set Up page which will show you how your first aircraft are loaded and activated within the Maintenance System.
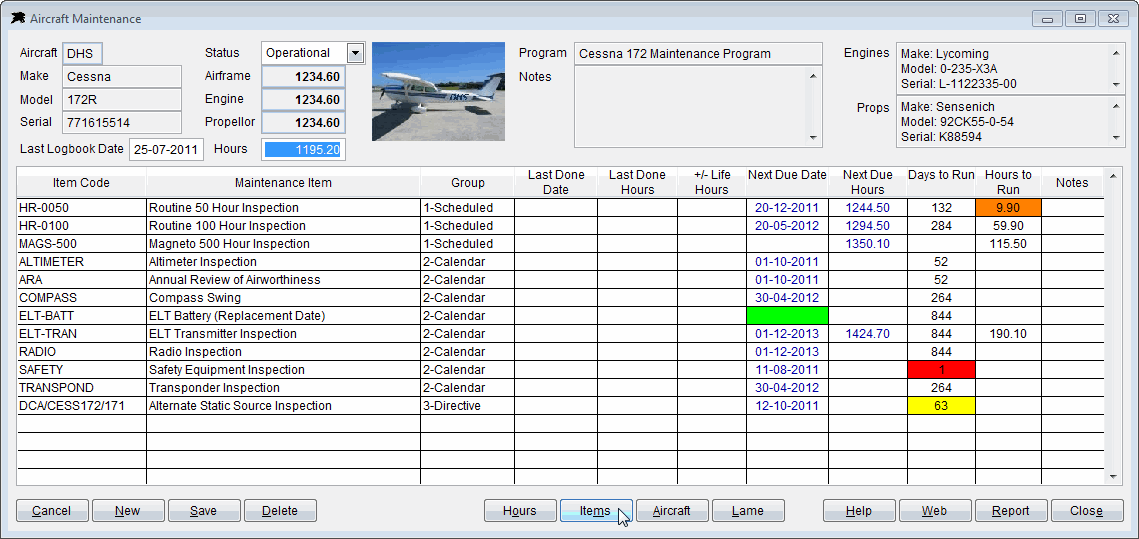
The Hours button will open the Aircraft Hours for manual input of tacho or air switch reading adjustments.
The Items button will open the Maintenance Items functions which are detailed below.
The Aircraft button will open the Aircraft File which you will need to access to add any aircraft before they can be displayed in the maintenance control system.
The Lame button will open the Licenced Engineers screen for a list of the normal engineering suppliers that maintain individual aircraft. This screen will also produce Technical Directive documents if required.
How to add a new aircraft to the Aircraft Master File
If your aircraft is not yet set up in the system, load the aircraft details using the File Menu option for the 'Aircraft File'.
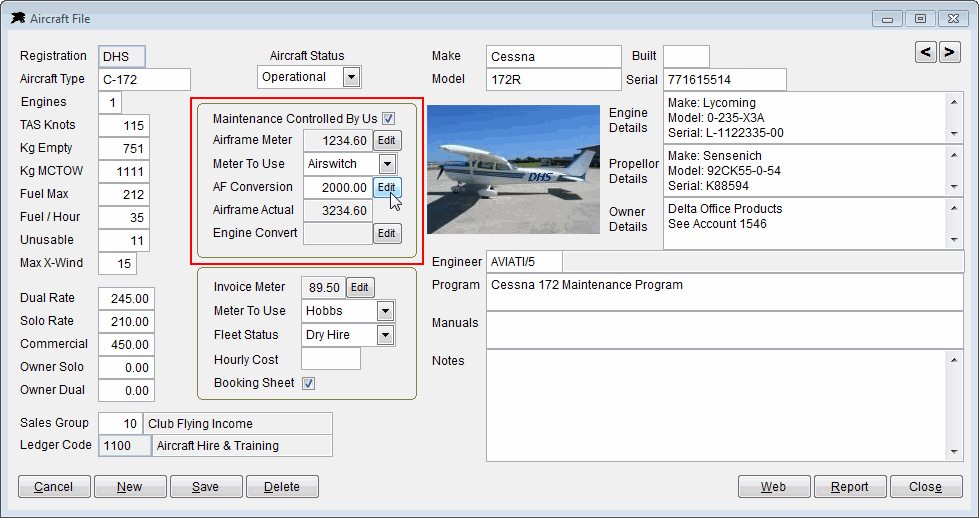
Click the new button and add all relevant details.
You can monitor maintenance item expiry times in this software by using the actual tacho or air switch readings or by using the conversion fields in the aircraft file to convert meter readings to actual airframe and engine hour logbook values. The simple option is to not use the conversion values because they can confuse inexperienced pilots and staff that are used to matching the tech log values to the relevant aircraft meters when verifying the state of the maintenance. How you use these values will depend on your current maintenance tracking structure.
If you decide to use these optional AF Conversion and Engine Convert fields, then you can convert the aircraft tachometer or air switch reading to the relevant Airframe hours where required. It is a simple math addition or subtraction. Input the amount of hours to add, or subtract, from the tacho reading to make it read Airframe Actual. The Engine Convert field is used to change airframe hours to Engine hours where you wish to track and monitor engine hours separately from airframe hours. You will see that you will be able to input and report both airframe and engine hours into the Maintenance Tracking grid. You need to set the 'Use Hours' field in the Maintenance Items file to display 'Engine' instead of 'Airframe' if you want to track an item using engine hours. See below for more information.
How to add a new aircraft to the Maintenance Tracking System
After your aircraft is set up properly in the Aircraft File, you may need to 'Add' the new aircraft to your Maintenance Tracking System. Because you may have aircraft online that are maintained by other organisations, aircraft loaded into your Aircraft File are not automatically designated a 'Maintained Aircraft' in the Datahawk system until you follow this procedure...
1. Open the Aircraft Maintenance form if not already loaded.
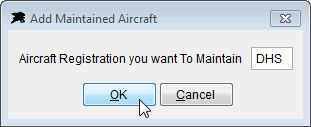
2. Click the 'Cancel' button or press ESC to clear the Aircraft Maintenance form so that you start with empty fields. Click the 'New' button.
3. Input the Aircraft registration you want to maintain.
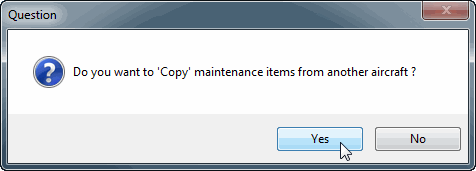
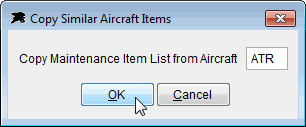
You will then be asked if you want to Copy Maintenance Items from another aircraft ?. You should always try to answer YES to this because it is much easier to use items from another existing similar model aircraft than to manually set up a blank file. Input the aircraft you want to copy items from. A new file will be created with all items from the other aircraft except for dates and hours.
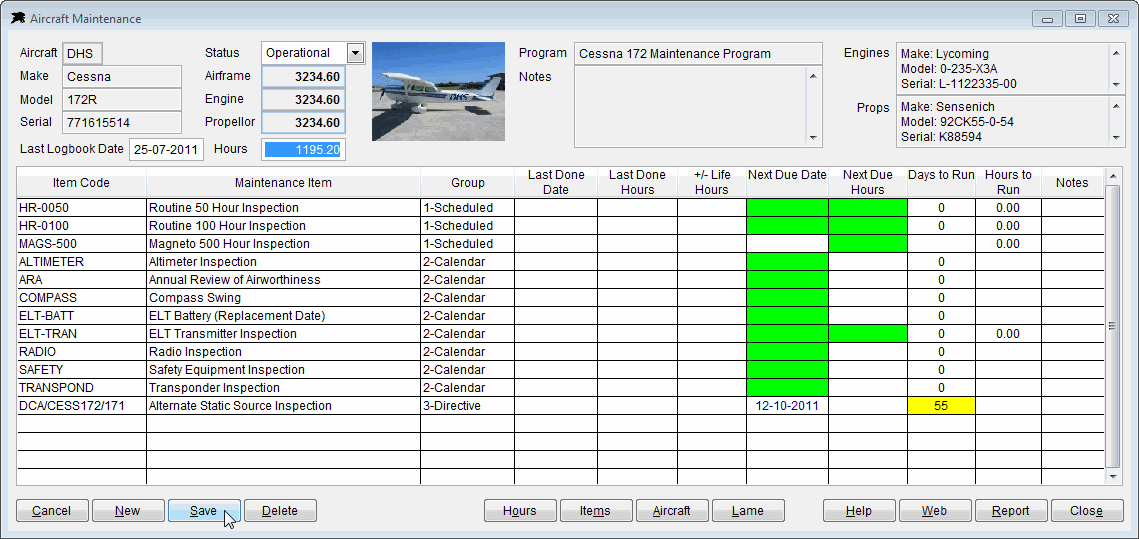
4. Load the new aircraft and input the relevant dates due and hours due into the fields with green backgrounds. You should always attempt to fill in all blank green background fields or remove the item from your list if it is not required for that particular aircraft.
After inputting a date or hours due into the fields with a green background, the numbers will be coloured blue to indicate that this is your primary input value. You should edit blue values when ever you need to update the aircraft details.
The value with the yellow background in the example above indicates an Airworthiness Directive item expiry or due time. Refer to the maintenance item set up details below.
Note - There are two options for inputting dates and hours depending on how you wish to use the system. You will use either the 'Normal' direct due date or airframe hours values into the 'Next Due Date' or 'Next Due Hours' fields as per the example above or you can use the 'Advanced' options where you will input the date or hours when the aircraft service or item was last maintained.
If you choose the advanced method, you will input the relevant dates and hours into the 'Last Done Date' and 'Last Done Hours' fields and the software will calculate the next due date or next due hours based on the maintenance item configuration (see below).
If a Next Date Due field or Next Hours Due field displays as red coloured numbers, then the software is telling you that you have input an 'Advanced Mode' value into a 'Normal Mode' slot. This will happen if you have set up an advanced calculated maintenance item code, have not filled in the date/hours last done, but have entered the date/hours next due.
If you are unsure about the 'Normal' or 'Advanced' usage, simply use the 'Normal Input' option when setting up your maintenance item codes, leave the 'Last Done Date' and 'Last Done Hours' blank and simply fill in the 'Next Date Due' or 'Next Date Hours'. This is the easiest method of using this maintenance tracking system.
How to add a new Maintenance Item Code
The maintenance item codes assist you by allowing you to set up a single maintenance item that can be used by one or more aircraft. For example, there is usually a single Maintenance Item Key Code (e.g. HR-0050) for the Routine 50 Hour Check and can be used on all your fleet aircraft. This means you only set up one code and simply select the aircraft that need it from the attached fleet list. In other cases you may need more than one code for a similar item. An example is engine STARTER motor overhauls. Because some may have a life of 2000 hours and others a life of 2400 or 1500 hours, then you simply create separate codes such as STARTER-2000 and STARTER-2400 that have different hours or months to run. Then simply 'tick' the relevant aircraft that use each key code. Follow these steps to create a new maintenance Key Code....
1. Click the 'Items' button from the Aircraft Maintenance screen or use File Menu then Maintenance Codes.
2. Click the 'Cancel' button or press ESC to clear the Maintenance Items screen so that you start with empty fields.
3. Click the 'New' button and input the new code into the Key Code field. example: STARTER-2000 (Lets assume we need a code for starter overhauls due every 2000 hours).
Your keycodes should be a short meaningful abbreviated code to represent the item. You will find that the software comes with some pre-loaded codes to give you some idea of how to structure your list. You do not need to have long keycodes for maintenance items because the description field is normally always displayed along side the codes. Just remember that the maintenance items will list in alphabetical keycode order so the initial spelling of the code will determine where it appears in the maintenance grid list.
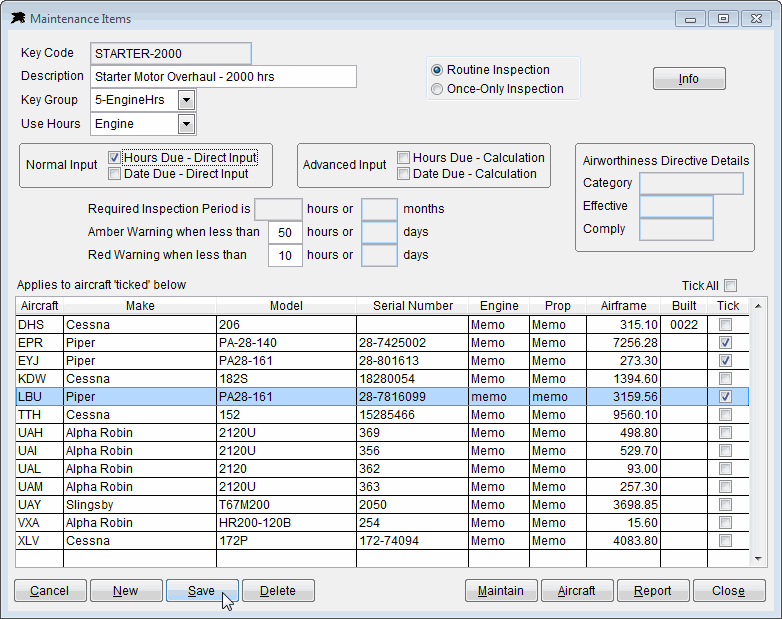
4. Input a description into the 'Description' field. e.g. 'Starter Motor Overhaul - 2000 hrs'
5. Set the Key Group to a relevant group. In this case I would use '5-EngineHrs' group because it is directly related to that.
6. The 'Use Hours' field can be set to monitor Airframe or Engine hours. If you have set up the aircraft file above with an engine hours conversion factor, then you would select 'Engine here', otherwise select 'Airframe'.
7. For simple normal input, tick the 'Hours Due Direct Input' or for advanced mode Tick 'Hours Due Calculation' and/or 'Date Due Calculation' box as required and input the number of hours (2000 in this case) or months that the item requires. You should now input the amber and red warning values (eg 50 hours for amber, or 10 hours for red). In this case, you would only tick one of the 'Hour' options because this Starter overhaul is due every 2000 hours and does not have a fixed date expiry that requires a date field also.
8. Tick the aircraft that need this item in the grid below, then click the 'Save' button. For this example, this inspection is only required on Piper aircraft so only those are ticked.
9. Click the 'Maintain' button or go back to your Aircraft Maintenance screen, call up the required aircraft you have ticked and input the date last done or hours last done in the new added maintenance item. If no date or hours have been input, they will display green input fields. This means you should input and save the required data.
How to add a new Airworthiness Directives
1. Click the 'Items' button from the Aircraft Maintenance screen or use File Menu then Maintenance Codes.
2. Click the 'Cancel' button or press ESC to clear Maintenance Items form so that you start with empty fields.
3. Click the 'New' button and input the new AD code into the Key Code field. I prefer to use the CAA directive code as the item keycode but feel free to create your own unique keycodes if desired. You do not need to have long keycodes for maintenance items because the description field is normally always displayed along side the codes. Just remember that the maintenace items will list in alphabetical keycode order so the initial spelling of the code will determine where it appears in the maintenance grid.

4. This step is not mandatory but is useful - Go to the CAA Website and look up the Airworthiness Directives page. Highlight the AD text you want and use and copy it. (Ctrl+C or right click mouse and click Copy). Click the 'Info' button on the Maintenance Items screen and use Paste or Ctrl V to copy the CAA AD text into Datahawk Copilot.
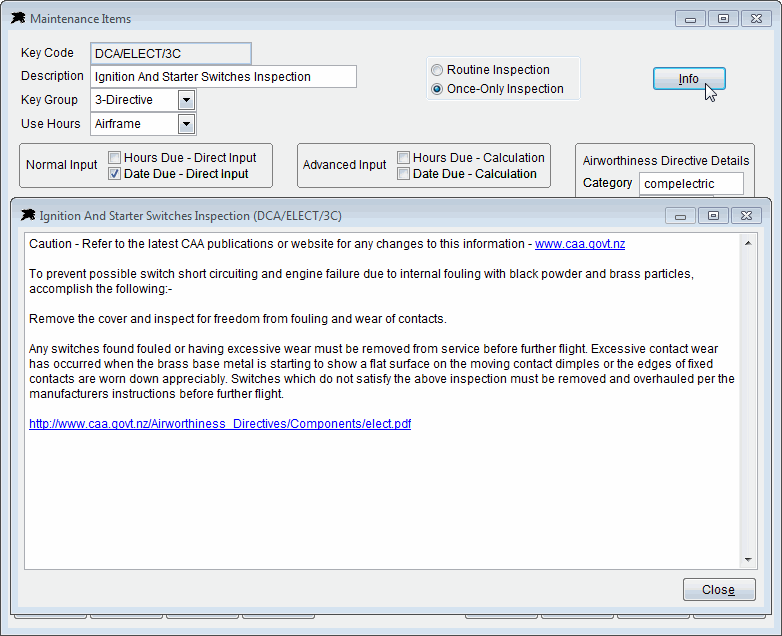
5. Put the AD heading text into the 'Description' field.
6. Make sure the Key Group is set to '3-Directive'.
7. 'Use Hours' field should be set to 'Airframe'.
8. Tick your choice of 'Hours Due' and or 'Date Due' boxes. Input number of hours or months that the AD requires if you want it calculated and then input the amber and red warning values.
9. Select the AD 'Category' from the list and input the effective and Comply (Compliance Date) dates if you wish.
10. Tick the aircraft that need this AD in the grid below, then click the 'Save' button.
11. Click the 'Maintain' button or go back to your Aircraft Maintenance screen, call up the required aircraft and input the date due or date last done or hours due or hours last done in the new added AD where the green input fields are displayed.