
Limited
Aircraft Maintenance System Set Up
This document is designed to assist you with initial configuration and set up of your aircraft maintenance tracking system. Because this system integrates into your flight invoicing system, you need to prepare your aircraft and maintenance files, then activate the system by loading an accurate set of airframe meter readings so that the accounting system will keep the aircraft hours up to date as flight data is input during the day.
Note - It is important that you have skilled flight entry staff to ensure that accurate meter reading figures are input for all flights to ensure that the reporting systems calculate the correct time remaining on all fleet aircraft. Any mistakes made during flight input will immediately change the hours to run on the maintenance items within the system which could cause aircraft to overrun their hourly limits.
Step 1 - Ensure that all aircraft that you wish to maintain are loaded correctly into the Aircraft File. Please try to fill in all details to make the maintenance system display useful information. Key fields used by the maintenance screens are Aircraft Type (e.g. C172), Make (e.g. Cessna), Model (e.g. 172R), Built (e.g. 1975), Serial (number), Engine Details, Propellor details and most of the other fields on the right side of this screen. The meter readings are explained later in this document.
Step 2 - Check for or create all your required Maintenance Item Codes. This software comes with a preloaded set of items to assist you in setting this file up and the Aircraft Maintenance Operating Manual page will assist you in editing this file. You should try to set up all required items that you want to track before activating the maintenance options.
Step 3 - Input your first aircraft for maintenance tracking into the Maintenance system. You should plan to input only one aircraft and then fine tune your settings and items before loading any other aircraft. The reason for this is that our software allows you to quickly copy all maintenance tracking items from an existing aircraft to a new registration while you are creating a file for it. For example, if you have a fleet of Cessna 152 aircraft, you can set up the first registration with the required tracked items to suit a C152, then copy the same items for all other fleet registrations as you load them. You can also add or delete any items at any other stage but setting up a single aircraft to start with will avoid confusion while you learn how our system operates.
To add the first aircraft to your Maintenance Tracking System, Open the Maintenance form using the Maintenance option found on the Flightops menu. Click the 'Cancel' button or press Esc to clear the Aircraft Maintenance form so that you start with empty fields, Click the 'New' button, then input the Aircraft registration you want to maintain....
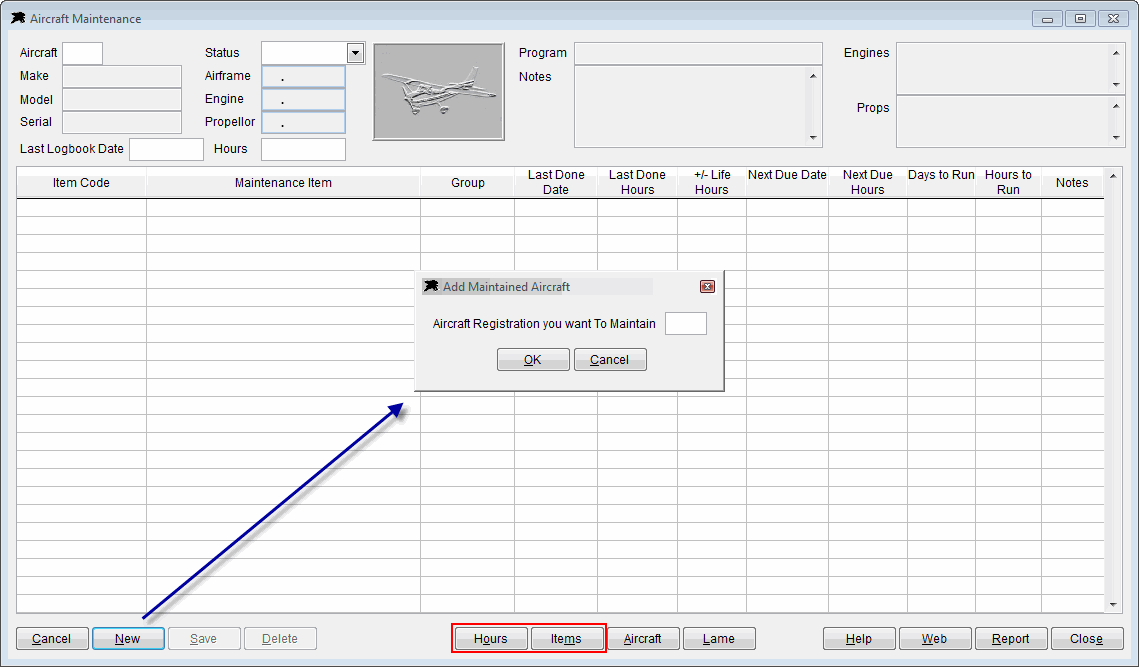
You will then be asked if you want to 'Copy Maintenance Items from another aircraft ?' - In this case you do not have any other aircraft to copy items from so just answer No to this question then click the Save button. You now have a single aircraft ready for tracking but it currently has no items to track...
Step 4 - Now click the Items button at the bottom of Aircraft Maintanance screen to open the Maintenance Items window. Choose an item that you want to add to your new maintained aircraft. In this example, we will add a Routine 50 Hour Inspection to our first aircraft. The maintenance 'item' code is HR-0050 in this case.
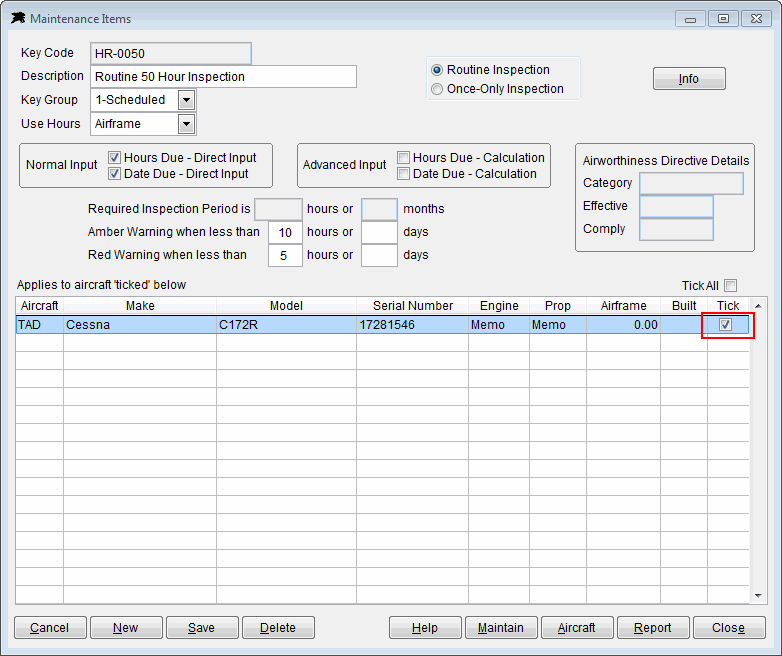
Simply tick the required aircraft registration to add a 50 hour check to your first maintained aircraft. Continue adding other maintenance items such as a 100 hour check, Safety Equipment, Radio, Instruments, Transponder, Compass Swing, ELT, Altimeter, ARA, Engine and Prop overhauls etc to your first aircraft by choosing the item then ticking the aircraft. You can check your progress but using the instructions on Step 7 of this page to view your new aircraft items.
Step 5 - When you are ready to trial the system with your first aircraft, you will need to input the starting Airframe meter reading into the Aircraft File. This can be done easily by choosing the Hours button on the main Aircraft Maintenance screen or by using the Aircraft Hours option located on the Flightops menu. You will receive a warning about doing this but in this case just continue and input the actual Tachometer or AirSwitch reading into this window and click the Save button.

Note - After your maintenance system becomes fully operational, you should not need to use this manual meter reading input because the airframe meter values will be input during daily flight invoice entry.
Step 6 - You now need to check that the Flight Invoice system is set up correctly for the invoicing staff to be able to input the Airframe meter readings along with the usual Hobbs meter values. You can check this simply by opening the Flight Invoice screen and checking to see if there is a Tacho or Airswitch field immediately below the Hobbs meter field. If these secondary fields are not visible, go to the Options File that is located on the Tools menu and choose the FlightAutoTacho option and change the 'N' to 'Y'. Save the changes then quit the Datahawk system, restart it, then check the Flight Invoice screen again.
Step 7 - Now return to the main Aircraft Maintenance screen and if not already loaded, load your new aircraft registration and you will see a display similar to this....
You have now sucessfully set up your first aircraft file. Now simply fill all the green fields with the relevant dates and times for this particular aircraft. Trial the maintenance system for a few days to ensure that the daily readings are input correctly and fine tune your Maintenance Items by adding or removing anything.
Final Step - When you are happy with the operation of the system and ready to load the rest of your fleet aircraft, simply follow the 'How to add a new aircraft to the Maintenance Tracking System' procedure found on the Aircraft Maintenance Operation Manual page. Just load a new registration then use the Copy option to duplicate the Maintenance Items on your first live aircraft.